Free SSH Access For IoT Devices: Your Guide To Remote Control
Having the ability to connect with your Internet of Things (IoT) devices from anywhere is, quite frankly, a huge advantage. Imagine adjusting settings on a smart garden system while you are away, or perhaps checking sensor readings from a remote weather station without physically being there. This kind of remote interaction makes managing your connected gadgets incredibly convenient. For many, the idea of getting this kind of access, especially without spending money, is really appealing. This guide is all about helping you achieve just that.
The core method we often use for this kind of remote connection is something called Secure Shell, or SSH. It is, you know, a very reliable way to get a secure channel over an unsecured network. Think of it like a private, encrypted tunnel directly to your device. This allows you to send commands, transfer files, and even run programs on your IoT gadget as if you were sitting right in front of it. It is, arguably, a cornerstone for anyone serious about controlling their devices remotely.
The best part is that you can often set up and use SSH for your IoT devices without any direct cost. This means you can gain powerful control over your smart home gadgets, hobbyist projects, or even small business sensors, all while keeping your budget intact. We will walk through the steps, tools, and important security tips you will need to make this happen, giving you, basically, the freedom to manage your IoT world from a distance. So, let's get into how you can get started with this handy approach.
- Undress Tool
- Fred Trump
- What Characters Did Adam Sandlers Daughters Play In Happy Gilmore 2
- 6th Year
- Why Was Trump Impeached The First Time
Table of Contents
- What Exactly is SSH for IoT?
- Why Seek Free SSH Access?
- The "My Text" Reference: A Quick Clarification
- Getting Started: Preparing Your IoT Device
- Essential Free Tools for SSH Access
- Step-by-Step: Connecting to Your IoT Device
- Securing Your Free SSH Connection
- Common Challenges and Simple Fixes
- Advanced Tips for Remote IoT Management
- The Future of Free IoT Access
- Conclusion
What Exactly is SSH for IoT?
SSH, or Secure Shell, is a network protocol that gives you a secure way to operate network services over an unsecured network. For IoT devices, this means you can get a command-line interface to your device from a different computer, even if that computer is far away. It is, in a way, like having a direct keyboard and screen for your device, but through the internet. This is really useful for devices that do not have their own screen or keyboard, which is pretty common for IoT gadgets.
When you use SSH with an IoT device, you are, in essence, creating a secure communication channel. This channel encrypts all the data that passes between your computer and the device. This protection is super important because IoT devices can sometimes be vulnerable if their connections are not secure. So, if you are sending sensitive commands or checking private data, SSH helps keep that information safe from prying eyes. It is, basically, a fundamental tool for managing these small, connected computers.
Why Seek Free SSH Access?
The appeal of "free" SSH access for IoT devices is, quite frankly, huge for many people. First off, it significantly lowers the barrier to entry for hobbyists, students, and anyone just starting out with IoT projects. You do not need to invest in special software or subscription services just to get your devices talking. This means you can experiment, learn, and build without worrying about extra costs piling up. It is, arguably, a great way to get hands-on experience.
- Tdm Somali
- Yungblud Billboard Picture
- 6th Year Or 6th Years
- Telegram Web Features
- Did Donald Trump Go To College
For small businesses or individual developers, free SSH tools also offer a cost-effective solution for managing a fleet of devices. If you have a few dozen sensors deployed, paying for a commercial remote access solution for each one can add up quickly. Using free, open-source SSH options helps you keep operational expenses down while still maintaining a good level of control and security. This approach, you know, makes remote management accessible to almost everyone.
Furthermore, many of the best free SSH tools are also open-source. This means their code is available for anyone to look at, which often leads to better security and more frequent updates from a community of developers. This collaborative development model means that any vulnerabilities are often found and fixed quickly. So, in a way, "free" also often means "reliable" and "well-supported" in the world of SSH. It is, essentially, a win-win situation for users.
The "My Text" Reference: A Quick Clarification
It is important to clarify something right off the bat, as a matter of fact. The term "Access" can sometimes mean different things depending on the context. While we are discussing how to "access" IoT devices using SSH, the provided "My text" actually refers to Microsoft Access. This is a database management system (DBMS) from Microsoft, a tool for organizing, analyzing, and utilizing data, often used to create desktop databases and applications without needing to write a lot of code. It combines a relational database engine with a graphical user interface.
So, to be honest, while "My text" talks about the features of Microsoft Access, like building databases from templates, its use as a data container, or its role as a software interface development frontend, it is completely separate from accessing IoT devices via SSH. The context of "My text" is about a software product for data management, not about network protocols for remote device control. Just wanted to clear that up, you know, so there is no confusion about what we are talking about here.
Getting Started: Preparing Your IoT Device
Choosing the Right Device
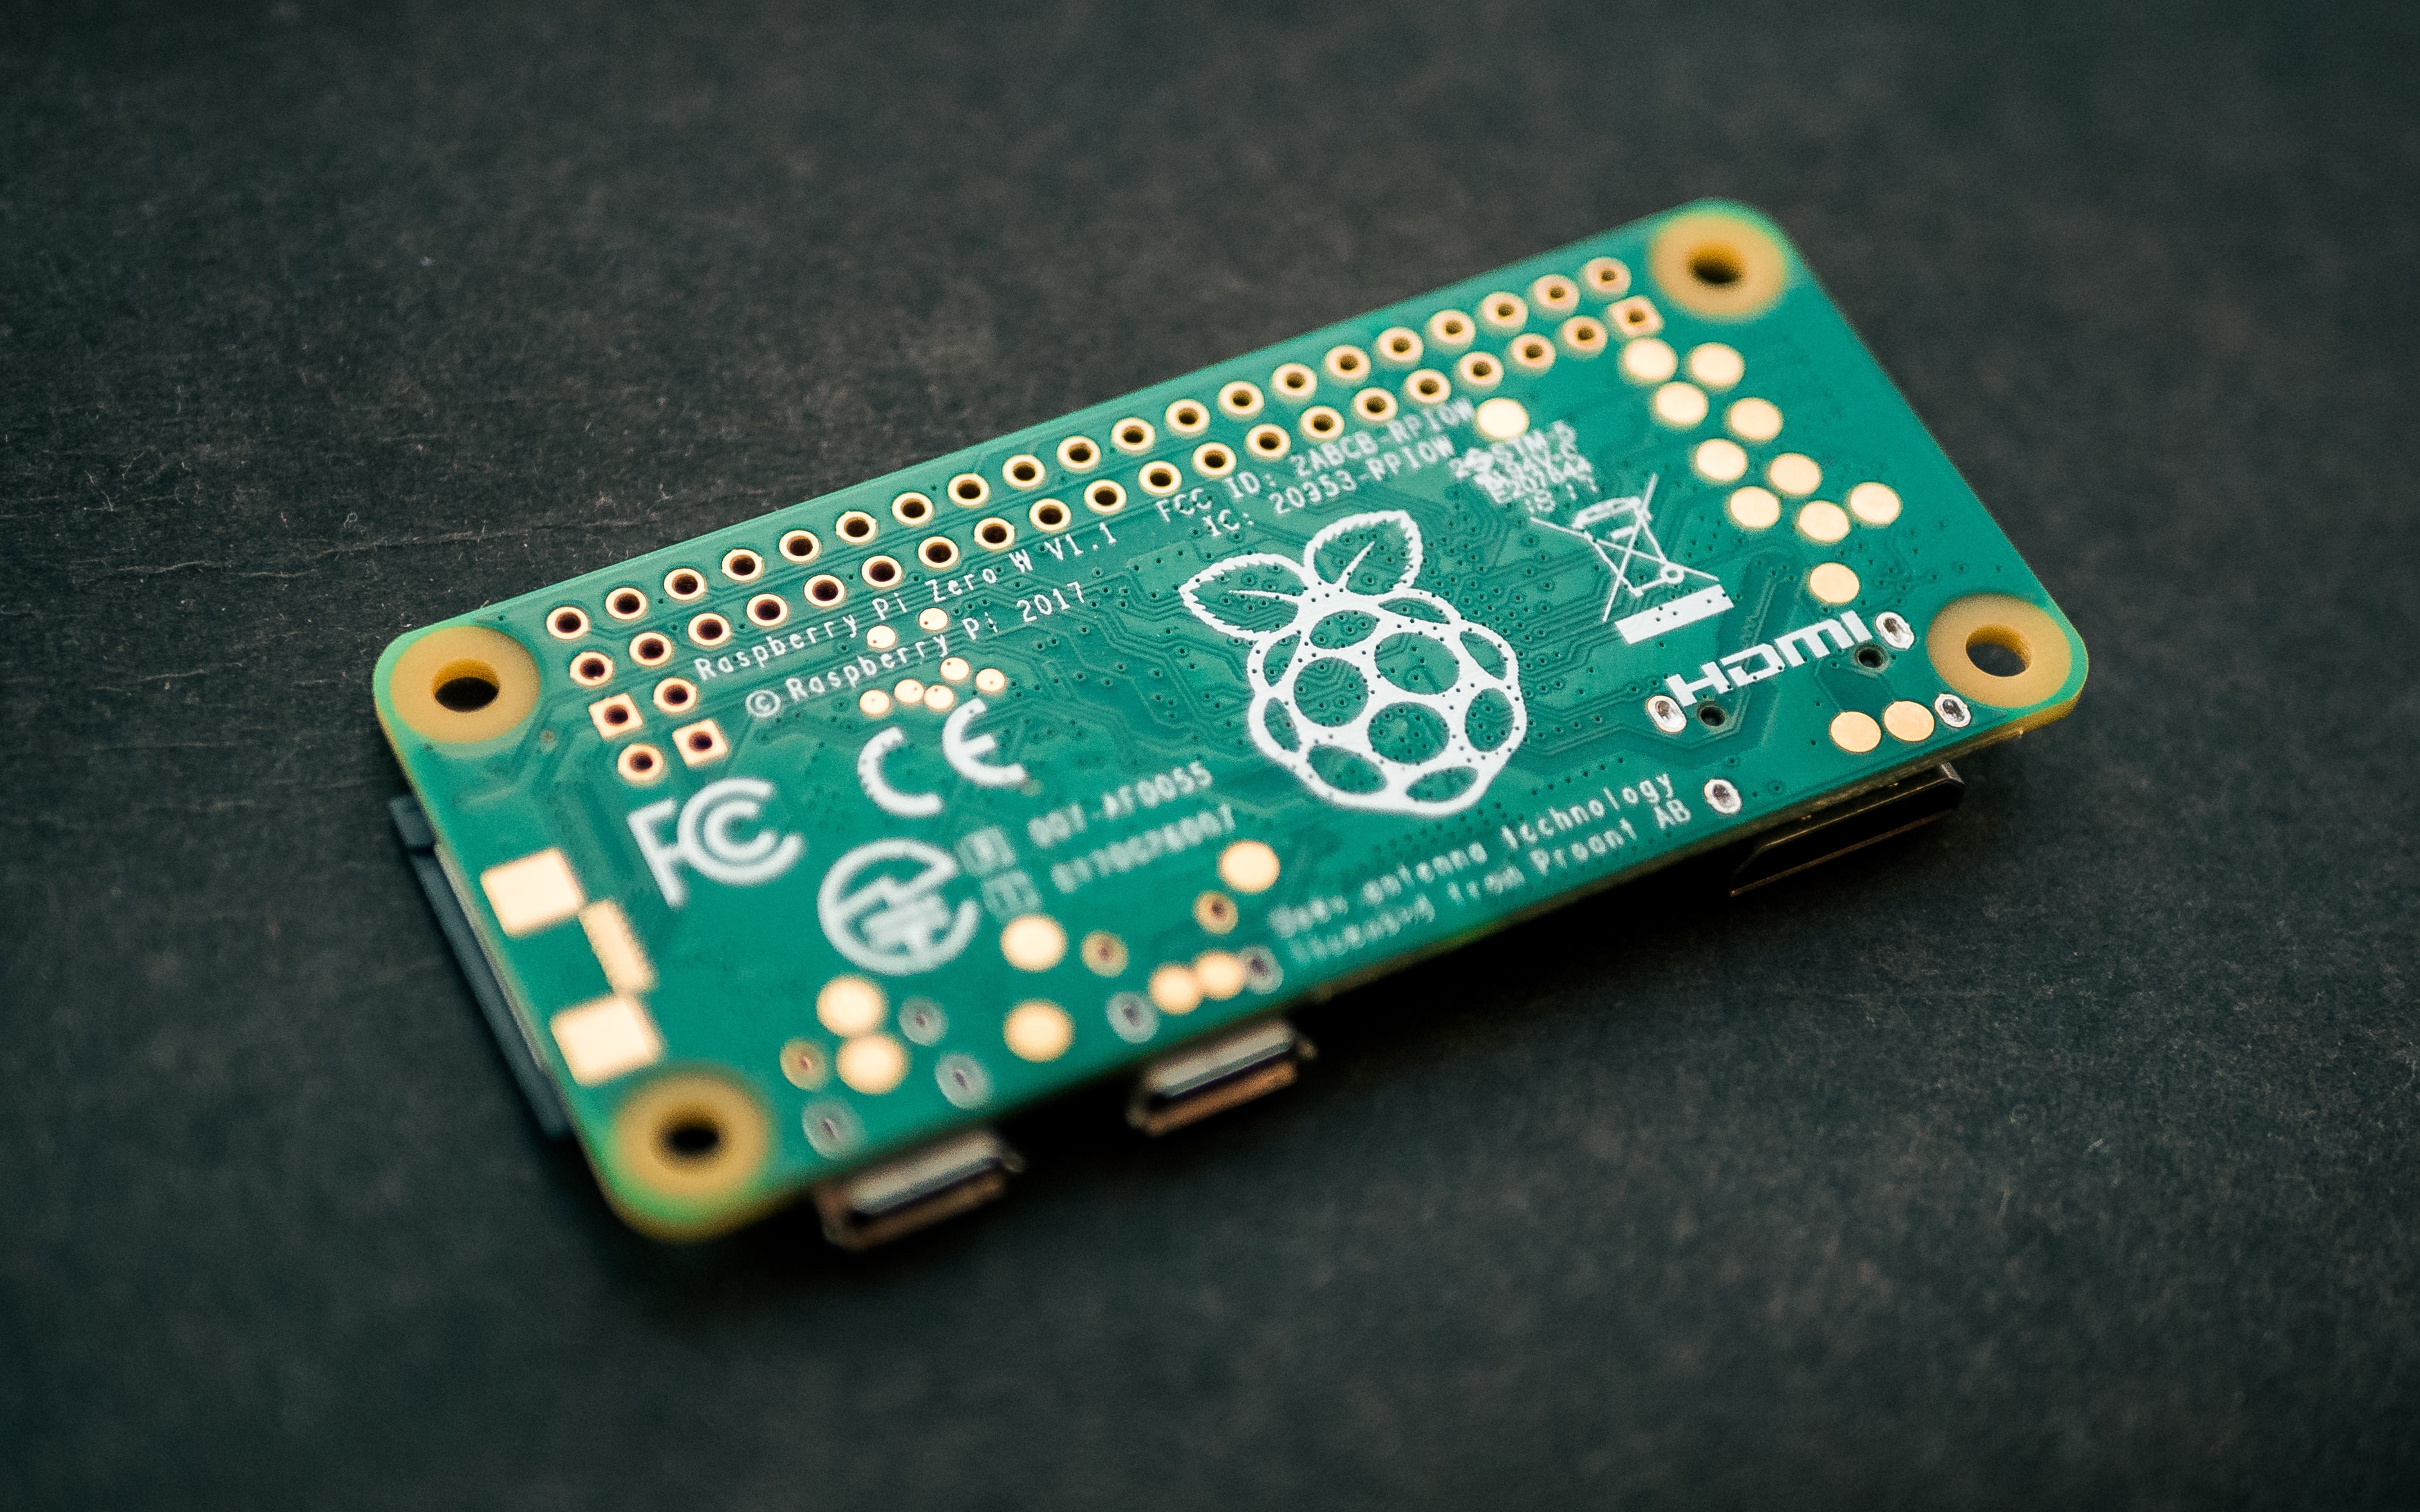
Not every IoT device is built to support SSH access, so you need to pick your hardware wisely. Devices that run a full operating system, like a version of Linux, are usually good candidates. Think about single-board computers such as the Raspberry Pi, BeagleBone Black, or even some Orange Pi models. These devices are, typically, designed to be flexible and allow for deep system access, which includes SSH. They have the processing power and memory to run the necessary SSH server software. It is, basically, the first step to making your remote control dreams a reality.
On the other hand, very small, resource-constrained microcontrollers like an ESP32 or ESP8266 might not natively support a full SSH server. While some custom firmware or libraries might offer a limited SSH-like shell, it is not the same as a complete SSH server running on a Linux system. So, when you are selecting your device, consider what kind of operating system it runs and how much control it gives you over its software environment. You want something that is, more or less, ready for this kind of setup.
Setting Up the Operating System
Once you have your device, the next step is to get its operating system ready. For most Raspberry Pi-like devices, this means installing a Linux distribution, often a variant of Debian called Raspberry Pi OS (formerly Raspbian). You will usually download an image file and write it to an SD card. This card then becomes the "hard drive" for your IoT device. Make sure you follow the official instructions for your specific device and OS version. It is, you know, pretty important to get this part right.
During the initial setup, you will often have the chance to configure basic network settings, like connecting to your Wi-Fi network. This is a crucial step because your device needs to be on a network to be accessible via SSH. Some operating systems might even give you the option to enable SSH right from the start during the setup process. If not, don't worry, we will cover how to turn it on later. Just make sure your device can connect to your local network, and you are, basically, good to go for the next steps.
Essential Free Tools for SSH Access
OpenSSH: The Standard Bearer
When it comes to SSH, OpenSSH is, honestly, the undisputed champion. It is a suite of secure networking utilities based on the Secure Shell protocol. For Linux and macOS users, OpenSSH is usually pre-installed. This means you can open your terminal or command prompt and start using SSH commands right away without needing to download anything extra. It includes the `ssh` client for connecting to remote machines and the `sshd` server that runs on the remote device to accept connections. It is, essentially, the backbone of free SSH access.
For Windows users, OpenSSH is now available as an optional feature in Windows 10 and Windows Server 2019 and later. You can install both the OpenSSH client and server through the "Optional features" setting. This makes Windows a much friendlier environment for SSH operations than it used to be, as a matter of fact. Using OpenSSH means you are using a widely tested, secure, and constantly updated tool that is, pretty much, the industry standard. It is, arguably, the best choice for most people.
PuTTY: A Windows Favorite
Before OpenSSH became readily available on Windows, PuTTY was, for many years, the go-to SSH client for Windows users. It is a free and open-source terminal emulator, serial console, and network file transfer application. PuTTY provides a graphical user interface (GUI) that makes it easy to save connection profiles, manage SSH keys, and configure various connection settings. If you are on an older Windows system or simply prefer a visual interface over the command line, PuTTY is still a very solid choice. It is, you know, quite user-friendly.
PuTTY is quite lightweight and does not require installation; you can just download the executable file and run it. This makes it very convenient for quick connections or for carrying on a USB drive. While OpenSSH is gaining ground on Windows, PuTTY remains a popular and reliable option for many. It is, essentially, a classic tool that still serves its purpose very well, especially for those who are just getting started with SSH on Windows. So, it is definitely worth considering.
Other Helpful Utilities
Beyond the main SSH clients, there are other free tools that can make your remote IoT management even smoother. For transferring files securely, `scp` (Secure Copy Protocol) and `sftp` (SSH File Transfer Protocol) are often included with OpenSSH. These allow you to move files between your computer and your IoT device without needing separate file transfer software. They are, you know, incredibly handy for deploying updates or pulling logs.
For more advanced users, tools like `ssh-keygen` (for creating SSH keys) and `ssh-agent` (for managing keys) are also part of the OpenSSH suite. These utilities help you set up more secure authentication methods, which we will discuss later. There are also many mobile SSH clients available for smartphones and tablets, like Termius or JuiceSSH, that let you connect to your IoT devices on the go. These mobile apps are, basically, like having a remote control in your pocket, which is pretty neat.
Step-by-Step: Connecting to Your IoT Device
Enabling SSH on Your Device
Before you can connect, you need to make sure the SSH server is running on your IoT device. For Raspberry Pi OS, you can enable SSH in a few ways. If you have a monitor and keyboard connected, you can go to "Raspberry Pi Configuration" under the Preferences menu, then navigate to the "Interfaces" tab and enable SSH there. This is, arguably, the simplest method if you have direct access.
Alternatively, if you are setting up a "headless" device (without a monitor), you can enable SSH by creating an empty file named `ssh` (no file extension) in the boot partition of the SD card after you have written the operating system image. When the Raspberry Pi boots up, it will detect this file and enable SSH automatically, then delete the file. This is, honestly, a very convenient way to get things going without needing a screen. Remember to remove the file once SSH is enabled for security reasons.
For other Linux-based IoT devices, you might need to install the SSH server package. This usually involves running a command like `sudo apt update` followed by `sudo apt install openssh-server` in the device's terminal. After installation, the SSH service should start automatically. You can check its status with `sudo systemctl status ssh`. This ensures that the SSH server is, essentially, listening for incoming connections.
Finding Your Device's IP Address
To connect to your IoT device, you need its IP address on your local network. If your device is connected to a monitor, you can usually find its IP address by opening a terminal and typing `hostname -I` (that is a capital 'i'). This command will, typically, show you the IP address assigned to your device. It is, basically, like finding its street address on your home network.
If your device is headless, you can often find its IP address by checking your router's administration page. Most routers have a section that lists all connected devices and their assigned IP addresses. Look for a device name that matches your IoT gadget, like "raspberrypi." Another trick is to use a network scanning tool on your computer, such as Nmap or a simple IP scanner, which can discover devices on your network. This is, you know, pretty helpful when you cannot see the device directly.
Making the First Connection
With SSH enabled and the IP address in hand, you are ready to make your first connection. Open a terminal (on Linux/macOS) or PuTTY (on Windows). The command to connect is straightforward: `ssh username@ip_address`. For a Raspberry Pi, the default username is usually `pi`. So, you would type something like `ssh pi@192.168.1.100` (replace the IP with your device's actual IP). The first time you connect, you might see a warning about the host's authenticity; type `yes` to continue. You will then be prompted for the password. The default password for Raspberry Pi OS is `raspberry`. After entering it, you should see a command prompt for your IoT device. Congratulations, you are, essentially, in!
If you are using PuTTY, you would enter the IP address in the "Host Name (or IP address)" field, make sure the port is set to 22 (the default for SSH), and click "Open." A terminal window will appear, asking for your username and then your password. Once you provide them, you will have remote access. This initial connection is, you know, a pretty exciting moment because it confirms your setup is working. Learn more about on our site, and link to this page our dedicated page.
Securing Your Free SSH Connection
Changing Default Passwords
The very first thing you should do after making your initial SSH connection is to change the default password. Default passwords are, honestly, a huge security risk because they are widely known. Anyone who knows the default username and password for your device could potentially gain access to it. On a Raspberry Pi, you can change the password by typing `passwd` in the terminal and following the prompts. Choose a strong, unique password that is hard to guess. This simple step is, arguably, one of the most important things you can do to protect your device.
Using SSH Keys for Better Security
For even stronger security, you should consider using SSH keys instead of passwords. SSH keys come in pairs: a private key that stays on your computer and a public key that you place on your IoT device. When you try to connect, your computer uses the private key to prove its identity to the device, which checks it against the public key. This method is much more secure than passwords because private keys are very difficult to guess or brute-force. It is, basically, like having a super complex, uncrackable lock and key system.
To generate SSH keys on your computer, you can use the `ssh-keygen` command. It will create two files, typically `id_rsa` (your private key) and `id_rsa.pub` (your public key). You then copy the public key to your IoT device's `~/.ssh/authorized_keys` file. There is a convenient command for this: `ssh-copy-id username@ip_address`. This command will, you know, handle the transfer for you. Once set up, you will not need to type a password to connect, making your access both more secure and more convenient.
Disabling Password Authentication (Optional but Recommended)
After you have successfully set up SSH key authentication, you can, optionally, disable password authentication entirely on your IoT device. This means that only users with the correct SSH key can log in, making it virtually impossible for someone to guess their way in with a password. To do this, you will need to edit the SSH server configuration file, usually located at `/etc/ssh/sshd_config` on your IoT device. Find the line that says `PasswordAuthentication yes` and change it to `PasswordAuthentication no`. Then, restart the SSH service with `sudo systemctl restart ssh`. This step is, you know, a really good way to lock down your device.
Keeping Software Updated
Regularly updating the software on your IoT device is, honestly, a critical part of maintaining security. Software updates often include patches for security vulnerabilities that have been discovered. Running outdated software means your device could be open to known attacks. For Linux-based systems, you can update your device by running `sudo apt update` followed by `sudo apt upgrade` in the terminal. It is, basically, like giving your device a regular security check-up and making sure it has the latest defenses. Do this, you know, pretty often.
Common Challenges and Simple Fixes
Connection Refused
If you get a "Connection refused" error, it usually means the SSH server is not running on your IoT device, or a firewall is blocking the connection. First, check if the SSH service is active on your device (e.g., `sudo systemctl status ssh`). If it is not running, try starting it (`sudo systemctl start ssh`). Also, make sure your device's firewall (like `ufw` on Linux) is not blocking port 22. You might need to add a rule to allow SSH traffic. This is, you know, a pretty common hiccup.
Authentication Errors
"Permission denied" or "Authentication failed" errors mean your username or password is wrong, or your SSH keys are not set up correctly. Double-check your username and password. If you are using SSH keys, make sure your private key is correct on your computer and the public key is correctly placed in `~/.ssh/authorized_keys` on your IoT device. Also, ensure the permissions on the `~/.ssh` directory and the `authorized_keys` file on the device are set correctly (usually 700 for the directory and 600 for the file). These permissions are, basically, vital for security and function.
Network Issues
Sometimes, the problem is simply that your computer cannot reach your IoT device on the network. First, confirm your IoT device is connected to the network and has an IP address. You can try to `ping` the device's IP address from your computer to see if it responds. If it does not, there might be a problem with your Wi-Fi connection, or the device might not be powered on. Check your router's settings to ensure the device is indeed connected and that there are no IP address conflicts. It is, you know, pretty frustrating when it is just a simple network glitch.
Advanced Tips for Remote IoT Management
Port Forwarding and VPNs
To access your IoT device via SSH when you are outside your home network (e.g., from work or a coffee shop), you will need to configure your home router. One way is to set up port forwarding, which directs incoming SSH requests from the internet to your specific IoT device on your local network. However, port forwarding can be a security risk if not done carefully, as it exposes your device directly to the internet. A more secure alternative is to set up a Virtual Private Network (VPN) on your home network. This creates a secure tunnel to your home network, allowing you to access your devices as if you were physically there, without directly exposing them to the internet. It is, arguably, a much safer approach for remote access.
Automating Tasks with SSH
SSH is not just for manual control; you can also use it to automate tasks on your IoT devices. For example, you can write shell scripts on your computer that connect to your device via SSH and run commands automatically. This is incredibly useful for scheduling
- Yungblud Billboard With Billie Eilish
- What Do People Post On Onlyfans
- Did Celine Dion Did
- Did Adam Sandlers Daughter Play In Happy Gilmore
- Did Celine Dion Died

IoT SSH Remote Access - SocketXP Documentation

How to Remote Access IoT SSH over the Internet
VNC SSH IoT Free: Unlocking Secure Remote Access For Your IoT Devices
